NEBUILDER® HiFi: the next generation of DNA Assembly
Script
Deana Martin:
Welcome to the NEBTV webinar series. Today, we have Tom Evans, who is the scientific director of our DNA Enzymes division. Hey, Tom.
Tom Evans:
Hey, Deana. How are you?
Deana Martin:
Great. And can you tell us a little bit about what you'll be talking about today?
Tom Evans:
Yeah, I'm talking about the NEBuilder® HiFi kit that's used for DNA assembly, and applications of that kit.
Deana Martin:
Great. Let's get started.
Tom Evans:
Hello everyone, and welcome to our webinar series on the NEBuilder® HiFi. Just a few notes before we begin the presentation.
If you're having trouble seeing the presentation, you may need to download Adobe Flash, which you'll see as a little "download Adobe Flash" symbol in the upper left corner of your screen. So, if you're having trouble with that, that's what you need to do.
The other thing is we have some widgets available. You can see them on your screen during the presentation. They link to various resources that may be useful to look at and to have access to as the presentation goes on.
So, this is going to be a presentation that sticks at a fairly high level about what any NEBuilder HiFi is capable of, what the requirements are for using it in your cloning workflows. We also have a few applications that we want to illustrate just to show what NEBuilder® HiFi can do, say, relative to other cloning techniques.
So, just first, NEBuilder® HiFi is a DNA assembly technique. And DNA assembly procedures have been around for some time. Obviously, traditional restriction enzyme-based cloning has been a real workhorse for manipulating DNA over the years. It still is an excellent technique that we use routinely. And really the hallmark of that is, not surprisingly, typical type IIP restriction enzyme cloning. You have a restriction site, your restriction enzyme comes in, cuts your DNA, say it either be a PCR product, or a vector, leaving single-stranded overhangs that can anneal to another fragment that you'd like to put together. The procedure's great, it's efficient, but typically we use clean up steps to purify the fragments and it does have some limitations with respect to it leaves a scar, and we'll talk about that a little bit more later.
Other techniques have been developed since restriction enzymes really took off. A very popular one in some of the synbio communities, in the synbio community is Golden Gate Assembly. At its heart, it's also a restriction enzyme-based cloning system, but it takes advantage of type IIS restriction enzymes and these types, these enzymes, unlike the type IIP, they cut outside of the recognition sequence and so this has the advantage of one recognition sequence can be used to assemble many different fragments. So because it, as is illustrated in the slide which appears on your screen, it can be used to generate various orthogonal overhangs, and so this has a lot of advantages for if you want to have fragments present in a vector, keep them in your freezer, be able to pull them out, use a single restriction enzyme to do different assemblies. So it is very popular.
Another one that's been around for a while is this general umbrella of ligation independent cloning. In its most simple form it uses an exonuclease, usually it's part of a DNA polymerase, 3' to 5' exonuclease, and so, and similar to any builder, which I'll talk about in a minute, it requires regions of homology between the two fragments in order to get the assembly. And so it uses the 3' to 5' exo to open up regions of single-stranded DNA that can anneal to the fragments that you want to assemble.
The disadvantages, or one of the outcomes of this is that you don't have covalent linkage of the ends and it requires passage to E. coli in order for E. coli to do the full repair and kick out a vector that you can use for subsequent down processes.
A procedure that was worked out here called USER® cloning utilizes, instead of a particular sequence of standard DNA bases, it takes advantage of a single nonstandard base of DNA, which in this case is uracil. And usually we incorporate that base using PCR primers that have a U in them. The fragments are then generated either by direct PCR, or, in the case of a vector backbone, we'll often do inverse PCR, to put the uracil in the right position. The advantage of this technique is that your scar is essentially one base, so it's very small, pretty easy to find a T typically in your sequence. It's also very precise.
So whereas ligation independent cloning will have regions of single-stranded DNA produced of various sizes, USER®, like restriction enzyme cloning, gives you very precise overhangs and so that can be advantageous for assembly. The disadvantage is you have to use a non-standard base.
And finally, the star of the presentation is NEBuilder® HiFi. So, it's a technique that we utilize in-house routinely and obviously we also sell a product based on it. I'll go into more details, but essentially it's efficient enough to allow multiple-fragment assemblies. Like ligation independent cloning, it requires regions of homology, but it helps to have the added advantage that it's covalently closed in vitro, allowing you to do PCR directly off of the in vitro closed, um, produced plasmids, I'm sorry, assemblies.
So for me, as a researcher, there isn't one perfect DNA assembly methodology, so we tend to use most all of these techniques. NEBuilder® HiFi is one of our favorite ones, but depending on the project, it may not be the perfect one. And so if you'll find on our website this synthetic biology selection chart, which helps you go through and maybe choose the right assembly method for your particular need. Synthetic biology is a very cachet name, and the selection chart takes advantage of that. But in actuality, the tools that synthetic biologists use are simply DNA assembly. So even traditional cloning needs, or projects, can take advantage of these tools. And that's truthfully what mostly we do, with those tools.
All right. Some added depth, in order to really utilize any tool effectively, you have to know what it does. What it's capable of, what it's not capable of, what its requirements are. And so the next few slides are going to go through NEBuilder® HiFi at just that very high level about what it needs, and what it does to the DNA. So at the most basic, it needs linear pieces of DNA. It won't work on any closed, circular, covalently closed DNA, like plasmids and whatnot. You really have to open those plasmids up and generate linear fragments. The other thing it needs is regions of homology because it uses those homology regions in order to assemble the proper fragments together. And we'll talk a bit more about the other requirements of those regions of homology as well.
And the way it works is, when you have a linear piece of DNA, double stranded DNA, there's an exonuclease in there that chews back from the 5' end of the DNA to generate a fairly large regions of single stranded DNA. These are then used, as I mentioned before, used as a way to find a reverse complement, then anneal, and then there's a polymerase present that fills in any gaps that might exist. At some point a nick is created that is accessible to a ligase which is also present in the mix. And as I mentioned before, one of the advantages of this system is that it generates, when it does its assembly, it generates covalently closed DNA fragments.
Again, at a high level, you need those regions of homology. So how can you can get those regions? One, is to simply have two fragments that happen to have regions already, that are complementary, that are homologous, in that case, it's easy to maybe do a restriction enzyme digest, mix them together, let the enzymes do their thing and end up with a new fragment. But more often than not you're going to have to add regions of homology to your fragments. And so, not surprisingly, the easiest way to do this is PCR. So you'll order PCR primers, with, it's the left hand part of the slide describes ordering a PCR primer that has regions of homology for Fragment B only. You can also do this by putting the region of homology onto Fragment B so that it's now homologous to Fragment A.
Some of the more interesting things is the outcome that really, you don't have to add regions that are found in either of the fragments originally. You can order PCR primers with regions of homology generated in the primers so you can add DNA sequence to your gene. You can actually do deletions this way. I'll talk about, you can use this property to do mutations as well. So as long as the homologous regions are there, it will join them together, but the beauty is they don't have to be there in the original fragments.
This is just to summarize what we were just talking about to make sure that we're on the same page before I jump into the more detail. It does require free ends, so no circular DNA. We used to recommend 15 to 40 base pairs, or nucleotides, of homologous region at the ends of the DNA fragments to be joined. The great thing about NEBuilder® HiFi, and I'll talk about this later in more, when we get into some more details is, those don't have to be directly at the exact end of the fragments, but you do need some regions of homology. We usually recommend about 0.1 picomole DNA fragments in a 20 microliter reaction.
Kind of the cool thing are the outcomes of this procedure. So traditional restriction enzyme cloning, as I mentioned, let's say you are using XhoI, you're using CTCGAG. When you do cloning with that kind of restriction enzyme, it will cut in the restriction region, and then when you reassemble your, when you assemble your new fragments, you'll still have a XhoI site there. So it has that little scar. It's only six base pairs, for a lot of applications it doesn't matter. If you're, you know, in the day, we used to try find ones that you could put silent changes in and end up with your restriction site. But in fact, with NEBuilder® HiFi, you don't need any specific sequence, you just need the sequences to match between the two fragments. So it can be perfectly scarless. The fragments are covalently joined, so then you can do PCR. You can put it right into E. coli too and get your plasmid out.
One of the other outcomes that we should point out is that because you can use any sequence, it does have the disadvantage of it may not be possible to pull the sequence back out of the plasmid without doing PCR. So if you use restriction enzymes, you're able to digest your plasmid again with the XhoI site. In the case of NEBuilder® HiFi, because you can choose any sequence, that may not be the case.
So what we're going to now is, we've kind of said what NEBuilder® can do, what it can't do, the advantages. We're now going to run through one of our online tools. And this is great, we use this quite often. It allows, oops, it's already running, sorry. Let me go back one. I want to set it up first. What this tool allows is you to more easily use these systems that require homologous regions in order to do the fragment assembly. So it's really there to help walk you through the procedure. It is different than restriction enzyme cloning. It will also spit out PCR primers, so that you can more easily just design and actually just take advantage of this system. So this is going to be a video in which I do a live voiceover, so it's going to be a fun time. So we'll see how this goes.
So again, this is a free tool available on our website. We're starting on our website. You go into "Tools & Resources" tab, and plasmid with kind of breaks in it is the NEBuilder® icon. We go over there, we'll click on that. It starts out at this "Get Started" page, and which is meant to help the new user get familiar with the tool. It has a lot of help and Q&A parts to the tool so that you can more effectively use it. But we're going to go right to "Set Preferences". The nice thing is, you may or may not want to use the default preferences, and so we're going to change some just for fun. So one thing would be, the overlap we recommend is usually 20, let's change it to 25 just to demonstrate. So one thing, we can go over there, change that to 25. The other thing is maybe you don't want to use Q5®. Maybe you want to use One Taq®, you had that in your freezer, so you can change that to One Taq ®. That'll change the parameters, and I'll show you what that means later, but essentially it'll change the outcome of the study.
I like to use Q5®, so we're going to stick with that because I like high fidelity enzymes for my cloning. So we'll stick with that. So now let's build a construct. So we're going to do a two fragment assembly, in which we have a vector backbone, and we're going to put a little piece of DNA into it. So you can paste any vector into that text box that you want, but we also have this drop down menu with a number of common vectors, and so we'll choose pET21. We've got pET21, this is our vector backbone, so we've got that clicked. If you unclick that, we're going to click it because it is our vector backbone but you can choose to do that.
Next thing it asks is "How are we going to linearize that vector?" Are we going to digest it with a restriction enzyme, are we going to do PCR? We're going to do PCR, because it's convenient. And then we have to say which site do we want to modify within the plasmid. We're going to specify sequence position. The little question marks, you can hover over to get any help, if you need it. So the positions we're going to choose are like, say, 173 within part of the plasmid, and also another plasmid position of, say, 179. So when we do our NEBuilder® HiFi assembly, we're actually going to have a deletion within this plasmid when we're done.
So we're going to move on to the next stage, which is to choose our sequence. And right now we're at the summary and you can see the algorithm has highlighted where we're going to do our assembly already, now we're going to add a fragment. In this case, we're going to paste in a piece of DNA, it's just random DNA just for demonstration purposes and we're cleverly going to name it Fragment 1, but we're going to put that into our vector. So, again, if you want to specify a backbone you can do that by clicking, but we're not going to do that so we'll leave that blank. And conveniently you can specify a reverse complement as well. Again, we don't want to do that so we'll click it and then unclick it.
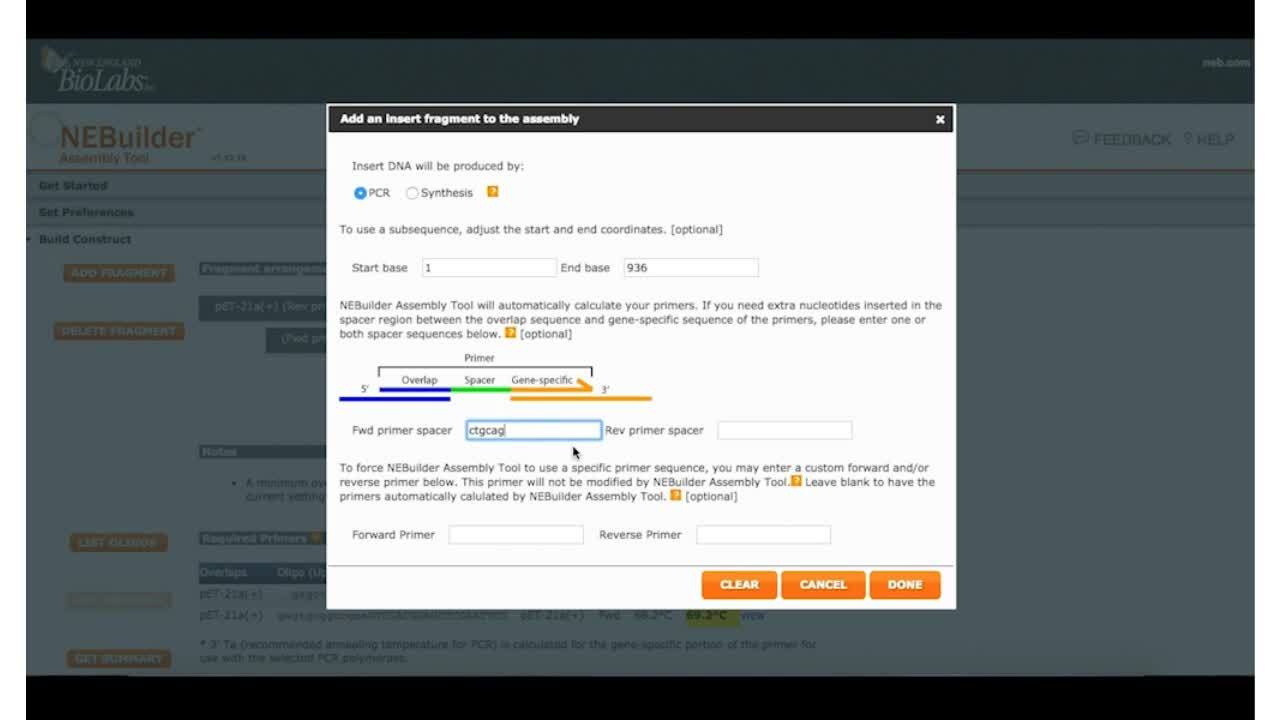
Now the program wants to know how are you going to generate this linear piece of DNA. Same kind of thing, is it a PCR product, is it synthetic, is it oligos, we're going to say PCR product. You can actually specify the primers to start with in that segment, but no, we're going to amplify the whole thing. We're just going to leave that alone. We are going to put a PstI site in, just so we can cut that region again, CTGCAG, we'll put that in. And now the program has the basic information it needs, to generate primers for you to do your assembly.
So we'll just say we're all done, and you can see, there's a grayish black region, which is the vector backbone, there's a red region, which is the region that we're going to be putting into the backbone, and there's primers that are flanking it. So all that's kind of visual there. And if you scroll, if you look down on that page, you can see that it gives it names for the overlaps. It also shows regions in, say, red, are the regions that are the PCR primer regions. The dark black CTGCAG is easily visible there, that's your PstI site that we added in, and the gray areas are the regions of homology that will end up being used by NEBuilder® to assemble these fragments. It also has, in yellow highlights, the annealing temperatures for the PCR reactions. It's nice and convenient, which is also why you need to specify your PCR enzyme. And it spits out the protocol for you to look at by saying, "I'd like to see the protocol."
It's got nice little calculations on it. How much fragment to use and the ratios are conveniently shown. And you can print that out and put it in your notebook. So that's essentially the bare bones of the online tool, it's very convenient to use. I hope that, if you haven't looked at it before, that you will take a look at it. You can do more than one fragments, you can do multiple fragments, what was demonstrated was easily just skimming the surface of what it's capable of.
So now that we have a little bit of background on what NEBuilder® is looking for in terms of doing DNA assembly, how you might go about designing some of the experiments, maybe using the online tool to do that, I'm going to go through some applications that we commonly use NEBuilder® HiFi for at New England BioLabs. One is not surprising, it's very convenient to do quick site-directed mutagenesis. I'm going to show a couple applications, one is, I think, really useful in its uniqueness.
So if you have a plasmid and you have a gene of interest, a target that you're studying, and you want to mutagenize a particular position, I don't know, knock out an active site residue, put in a His tag, something like this, you would do a quick mutagenesis. It's very common to do a PCR site-directed mutagenesis. That's a very good way to do that, but you can also use NEBuilder® HiFi. And in that case, you would maybe design PCR primers with a mutation in it, and that's what's represented here on the screen. The, say, Primer 1, or F1, has a red X which represents a mutation. Then you do your insert DNA PCR, and you get a mutation in your PCR product, and that can then feed into the NEBuilder® HiFi workflow. You can also order synthetic oligos, anneal them, and put them together and use that as well.
Once you have your target of interest you just need to linearize your vector so that you can put your fragment in. Again, either by restriction digest, probably preferably, in this case, inverse PCR, and then you can do your assembly and there you go.
I think the real strength, however, of this technology is the fact that you're not limited to just one mutation that maybe is close together. So once you start requiring mutations that are further apart in the DNA sequence, it becomes more and more difficult to do PCR-based site-directed mutagenesis, and so this is where the NEBuilder® HiFi really shines. Because you can easily put together more than one fragment; in this case we show an assembly of four fragments plus a vector backbone, for a total of five fragments. And in this case, again, hypothetically we chose to make three mutations in a gene sequence in which we have these 4 different fragments generated either by PCR, again, could be synthetic oligos, even restriction digests if you've got different mutants of plasmids, something like this. You mix them together in one pot so you can do this all at once, with the NEBuilder® HiFi, transform it into E. coli, screen colonies, and it's very efficient, so it's a good way to generate these kind of mutants. You can even generate libraries like this, actually.
A use of NEBuilder® HiFi that wasn't necessarily obvious, but was discovered by one of our application and development scientists, is the fact that you can utilize single stranded synthetic oligos to make changes to plasmids. When I first saw this, I was really quite amazed. It has an interesting utility. So there's a quick video about how that works and I'm not doing this voiceover, so I'll just let it do its thing, but it explains how this procedure can happen.
Video voiceover:
Bridge two double stranded DNA fragments with a synthetic single stranded DNA oligo for simple and fast construction. The bridge is designed as a single stranded 60 base pair oligo that contains 25-30 base pairs of homology with an end of each DNA fragment. The bridge can be customized to include additional sequences if desired. During assembly, the T5 exonuclease activity chews back the 5' end of the DNA fragment, generating a 3' single stranded overhang, which allows the oligo to anneal with it. The high fidelity DNA polymerase activity fills the gap, and DNA ligase seals the nick. The T5 exonuclease activity then cleaves again to allow it to anneal with the overhang on the other DNA fragment. The gaps are once again filled, and nicks are sealed.
Tom Evans:
When I was first presented with this, I thought, "That's very powerful, you just order a single oligo from your favorite oligo supplier, and you can make rapid changes." One of the things that we use it for is to generate single guide RNAs for rapid change to a plasmid, something where there's a small region of your plasmid that needs to be changed frequently. The way this works is you have your favorite sgRNA-creating plasmid, or plasmid you use to create your sgRNA, and you make it linear, either by inverse PCR or you may have a restriction site present at a convenient location within that plasmid. You order a synthetic oligo that has the necessary segments that is illustrated. You'll maybe have some region of homology, like partial promoter sequence is a region of homology found in the plasmid. Scaffold RNA sequence also found, is ingrained in the plasmid so you don't change that, and instead you will change the red region, the sgRNA target region, with respect to your needs and for your research, your gene editing research.
® thing is, once you order that, just drop it in with your linearized plasmid, mix with the NEBuilder® HiFi and let it do its thing. Plate out your E. coli cells, screen and find the correct ones, and then generate your sgRNA. Another interesting application of this is the creation of sgRNA libraries. Generating libraries can be tricky. You definitely want to maximize complexity, so if you order synthetic oligos, in which again, you have regions of homology to your plasmid, but instead of just a specific target RNA region, you just order a series of ends so that they're randomized. Otherwise the procedure is exactly the same. You mix your synthetic oligo with your randomized target RNA sequence in with your favorite plasmid of interest, let it react with NEBuilder® HiFi, plate it out, and what's illustrated here is one colony's been picked and sequenced, and it's got a nice single target site in it. However, that's not the interesting part. It's how diverse this library is.
So we sequenced a relatively small number of clones just to get an idea of the complexity. So we picked about 180, 190 colonies, sequenced them to get their unique, specific sg target sequence. I mean the RNA target sequence, and this is the... I apologize, the graphic isn't working on the presentation. Essentially what it illustrates is that we got nice, even coverage over the randomized region. And so, we did a WebLogo plot, and for 186, 190 clones, which isn't that many, really, we statistically got quite a good representation. So it also facilitates easy library construction.
Just to summarize, this is kind of a summary slide that would work for a number of workflows in that the NEBuilder® HiFi does the ligation, as well as other aspects of typical cloning all in one tube. It makes it much easier, so in an hour, you can transform. Whereas if you're doing more of a traditional restriction enzyme method, you might order two oligos, cut your vector, you have to anneal the vectors, I'm sorry, the oligos. You have to do the ligation as a separate step and then you do your transformation.
A very, I think, interesting use of NEBuilder® HiFi is commonly used in a colleague of mine's lab. His lab specializes in yeast expression and studies in yeast. And he gave me this nice picture of a few yeast cells for me to put up. But really, if you're doing yeast studies, one of the things we like to do is to put together different constructs that have different promoters, different selectable markers, different target genes, maybe, so that they can put them into the chromosome. Traditionally, they've been using, not surprisingly, some of the older, some of the more commonly used cloning techniques using restriction enzymes.
This slide is a busy one, but it's only to illustrate that, in the case of yeast expression, they will vary their terminators, they'll vary their selectable markers, obviously they're going to vary their recombination region, and certainly the target gene. And so the way they've done that in the past is to, oftentimes, linearly put together each of these fragments in a plasmid, and then clone the next one the next day, clone the next one the next day, and it can take five days to end up with an expression cassette.
What they are really excited about was, instead of taking five days, they can do a PCR of each region that they want to put together for their expression cassette, with regions of homology so they'll just assemble. And so again you can choose your recombination region, your terminator. In this case, the target is a Gluc expression cassette. You do the PCR, mix it all together in one tube, let NEBuilder® put them all together. They used to do one more step, but nowadays they simply transform this into yeast. So within a day, they can get their expression cassette into the yeast. Saves them a lot of time, one day versus five, so it really increases the productivity of the lab.
The next slide is just to illustrate that in fact, it worked. The control is the GG799. It doesn't have the target. The bars just show the strain that they transformed into, in fact expressed the target. So those three applications were to illustrate different ways that NEBuilder® can used in a lab, and also, hopefully, illustrate some ways that maybe it could streamline techniques that you already make use of. In the case of the yeast lab, it saved them days on their experiments.
I want to just address some common questions, certainly not all the questions that might come up, about NEBuilder® HiFi, some more of the technical, more detailed questions. For reaction setup, we have that nice little reaction protocol popup in the NEBuilder assembly tool, so that is something that you should read through in terms of getting the right inset ratio, putting in the right amount of DNA, all these, not surprisingly, will affect the reaction.
So one of the interesting things that I alluded to earlier was, that region of homology doesn't have to be necessarily right at the ends of the DNA. Most of the time, you're going to design this in such a way that it will just be right at the end. But there are certain instances where you might not want to do that. This is just a schematic of the problem, or the issue, or the reality, depending on how you look at it. You've got that region of homology that's away from one of the ends, so you have this flap, and what happens? The nice thing about NEBuilder HiFi, and this just illustrates the 3' end, it has a 3' to 5' exonuclease and the polymerase, so it will chew this back, and it will end up filling the gap back in, a nick will be generated at some point that'll get sealed, and so we'll be able to handle these 3' mismatches. It'll also handle 5' mismatches as well. Most of the time, it doesn't matter. There are certain applications where this is advantageous.
So I mentioned one of the great advantages of Golden Gate is, you can put different target sequences into plasmids and hold them in your freezer and mix and match at will, and just cut it out with a type IIS restriction enzyme to get that fragment available. So, you can't cut out things with NEBuilder® HiFi itself, so instead, you can do the same type of thing where you have fragments cloned into plasmids that maybe you commonly use. You cut them out with a restriction enzyme, but you want a scarless assembly. So that's okay, because you don't add any of that restriction enzyme sequence into the region of homology, so you generate mismatches. NEBuilder® HiFi removes those matches, and you end up with a scarless assembly even though you have a common restriction enzyme site present in maybe all of your plasmids. So that's the one instance where that utility does come into play.
I hope I've covered a lot of the high level of what NEBuilder® does, what it can do, what it can't do, some of the applications that we going through, some specific questions here and there that might trigger, hopefully trigger some thoughts about how you can do your experiments more effectively. And just to summarize: we use NEBuilder® HiFi for multi-positional site-directed mutagenesis, bridging double stranded DNA that is a plasmid with a single stranded oligo, which has its utility. The region of homology doesn't have to be right at end, that gives you some flexibility there. And the NEBuilder® Assembly Tool is a great resource when you're using this product. Thank you very much for your attention, and I think we'll have a quick question answer period.
Kari Goodwin:
Thanks so much Tom. So we are actually joined by two of our scientists here for some Q&A. First, we have Cathy Shea, who is a product manager for our cloning technologies, and we also have Pei Hsieh who's one of our applications scientists here at NEB. The first question we have is, "Can you generate a closed plasmid as a product of NEBuilder®"
Cathy Shea:
Hi, this is Cathy. You certainly can generate a closed plasmid, the HiFi Master Mix contains a ligase, which will seal the mix. That means that the plasmid that you generate can be used directly in PCR, or it can be transformed into E. coli.
Kari Goodwin:
Thanks Cathy. What methods do you recommend for cloning highly repetitive, GC-rich sequences?
Cathy Shea:
Okay. GC-rich sequences can be a problem in NEBuilder® or other assembly technologies like NEBuilder®. The GC regions can create misalignment in the overlapped region. So some better ways of cloning fragments that have repeats would be either USER® cloning, Golden Gate cloning, or traditional restriction enzyme cloning.
Kari Goodwin:
We also have another question. Someone would like to know "What happens if there are any mismatches in the homologous region?"
Cathy Shea:
Okay. Mismatches in the overlapped region...the polymerase does not pass through the overlapped region, so mismatches will not be repaired at that point. Once you transform it into E. coli, you will probably get two populations of plasmids. One population will have one of the sequences, and the other population will have the other sequence, and you'll need to do some selection, later on around to sort that out.
Kari Goodwin:
How long can the 3' and 5' mismatches be?
Cathy Shea:
We recommend that the 3' and 5' mismatches be 10 base pairs or less, though we have had some anecdotal reports from customers that they were successful using much longer mismatches.
Kari Goodwin:
Another question: "Why would you want to bridge a dsDNA with an ss oligo rather than a ds oligo?"
Cathy Shea:
The single stranded oligo certainly cuts down on your costs, you only need to buy one oligo instead of two. You do not have to anneal a single stranded oligo, obviously, so there would be no mistake in the annealing process. And single stranded oligos allow you to produce a variety of sequences in between the overlapped sequences, so you can actually use them to generate a library without the difficulty of annealing oligos that might have the same sequence at both ends but differences in the middle.
Kari Goodwin:
We have another question here: "Where can I learn about considerations for performing an ssDNA oligo bridge?"
Cathy Shea:
Okay. We have an application note and a video on our website. So if you visit the product page for NEBuilder® HiFi DNA Assembly Master Mix, I believe it's under the protocols or technical information, I'm sorry, I don't have my website in front of me, but there is an application note on our website.
Kari Goodwin:
Great. We can certainly send follow up information on that as well after the webinar. Another question here: "We have a plasmid containing two copies of a gene, and we need to introduce a point mutation into both copies of the gene simultaneously. What are the key points for us to use when using the HiFi kit for this application?"
Cathy Shea:
So in order to do multi-site mutagenesis, you would need to incorporate the mutation into the primer set for each fragment, so you would divide this into probably two or three fragments. Two fragments would contain the different mutations and the third fragment would probably be your vector backbone. You want to make sure that the overlapped regions are unique, that the fragments will reassemble in the correct order and orientation.
Kari Goodwin:
Another question here: "Has NEBuilder HiFi been used in CHO expression systems?"
Cathy Shea:
CHO, you mean Chinese hamster ovary cells? You certainly could, that would be a downstream application, you can make any sort of construct with NEBuilder® HiFi that you need to prepare the DNA in whatever way is appropriate for your transfection experiments. There's certainly nothing in the NEBuilder® HiFi protocol that would preclude it from being used to do mammalian transfection assays.
Kari Goodwin:
Right, another question here. "Sometimes I want to cut my plasmid with a single enzyme that cuts twice. Why can't NEBuilder® handle that situation?"
Cathy Shea:
Okay. NEBuilder® HiFi DNA Assembly Master Mix can certainly handle that situation, I presume you're talking about the NEBuilder® assembly tool. We're currently working on a new version, an updated version of the tool, but currently, the tool can only use single cutter restriction enzymes. There is a workaround for this. There is an option to select the end of the fragment by position within the plasmid. So you just need to know the coordinate of the 3' end generated by each of the restriction enzymes that you're using. You can input that into the tool.
Kari Goodwin:
Great. We have a lot of really great questions here, and I'm not sure we'll be able to get to all of them. Do you guys want to take two more questions, and then we'll certainly follow up with everyone after the webinar directly as well as hopefully send out an FAQ that were generated during this webinar, we have one question here: "What is the limitation of a fragment number on assembly?"
Pei Hsieh:
We have test so far, the most number of tests is 12 fragments, but the efficiencies decrease when you increase the fragment numbers.
Kari Goodwin:
All right. I think we'll take one more question. "How much is the assembly affected by the design of the homologous region? Do the length and GC content of the region play a role?"
Cathy Shea:
The length and the GC content can play a role, we have recommendations for the length of the overlapped region depending on how many fragments are in the assembly. In general, NEBuilder® HiFi DNA Assembly Master Mix works very well with a range of overlaps between 20 and 30 base pairs. You may need longer overlaps towards 30 base pairs if you're doing a four to six fragment assembly versus a two fragment assembly. The GC content has some effect, it's best not to have too many repeated elements in the overlapped region. You need to have the overlapped region be very specific in order to get ordered assembly of fragments.
Kari Goodwin:
Right. Everyone else, we will follow up online, offline, rather, as well as sending out a recording of this video so you can watch it again or check back with any questions. Again, there is a great, some widgets on the screen below, there's a "Resources" tab with some links to various application notes, and instructional videos on our website, so check those out at NEB.com, and if you have any questions, feel free to email us at webinars@neb.com. Thanks everyone.