Guidelines for Setting up PCR Reactions (E6627X only)
Setting up the PCR Reaction:
Symbols
 |
This caution sign signifies a step in the protocol that has multiple paths leading to the same end point but is dependent on a user variable, like the amount of input DNA |
2.1. PCR Amplification
For < 96 samples, follow the protocol in Section 2.1.1. For 96 samples, follow the protocol in Section 2.1.2.2.1.1. Setting up the PCR reactions (< 96 samples)
2.1.1.1. Determine the number of libraries that will be amplified and pooled for subsequent sequencing.
2.1.1.2. Ensure that you choose a valid combination of barcode primers based on color balance guidelines (see Chapter 3).
2.1.1.3. Thaw the NEBNext Direct Index Primer Mix Plate for 10-15 minutes at room temperature.
2.1.1.4. Remove the hard plastic plate cover. Briefly centrifuge the plate (280 ×g for ~1 min) to collect all of the primer at the bottom of each well.
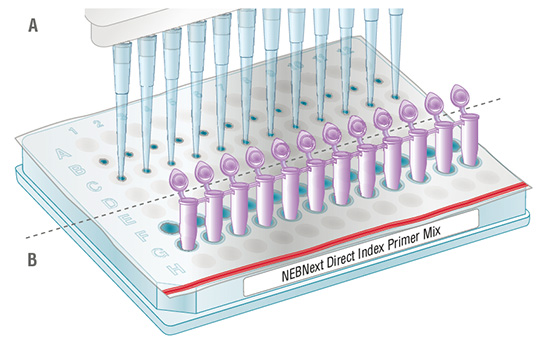
2.1.1.5. Orient the NEBNext Direct Index Primer Mix Plate as indicated in Figure 2.1 (red stripe towards the user). With a pipette tip, pierce the desired well(s) (Figure 2.1A) and transfer 5 µl of the primer mix required for the PCR reaction to the PCR plate/tubes. It is important to change pipette tips before piercing a new well to avoid cross contamination of indexed primers. Alternatively, the wells can be pierced using the bottom of clean PCR strip tubes (see Figure 2.1B) prior to pipetting the primer mix. Use a new, clean strip tube for each new well to be pierced.
Note: Each well contains the Universal Primer and the Index Primer. There is enough primer in each well for one PCR reaction. Do not reuse primer if the seal has been previously pierced, to avoid contamination with other indexed primers.
2.1.1.6. Proceed with the PCR reaction according to Chapter 1, Section 1.11.
2.1.2. Setting up the PCR reactions (96 samples)
2.1.2.1. Thaw the NEBNext Direct Index Primer Mix Plate for 10-15 minutes at room temperature.
2.1.2.2. Remove the hard plastic plate cover. Briefly centrifuge the plate (280 ×g for ~1 min) to collect all of the primer at the bottom of each well.
2.1.2.3. Orient the NEBNext Direct Index Primer Plate as indicated in Figure 2.1 (red stripe towards the user). With a pipette tip, pierce the wells (Figure 2.1A) and transfer 5 µl of the primer mix required for the PCR reaction to the PCR plate. It is important to change pipette tips before piercing a new well to avoid cross contamination of indexed primers. Alternatively, the wells can be pierced using the bottom of clean PCR strip tubes (see Figure 2.1B) prior to pipetting the primer mix. Use a new, clean strip tube for each new well to be pierced.
Note: Each well contains the Universal Primer and the Index Primer. There is enough primer in each well for one PCR reaction. Do not reuse primer if the seal has been previously pierced to avoid contamination with other indexed primers.
2.1.2.4. Proceed with the PCR reaction according to Chapter 1, Section 1.11.