Protocol for use with NEBNext Multiplex Small RNA Library Prep Kit for Illumina (Index Primers 1-48) (E7560)
Symbols
| This caution sign signifies a step in the protocol that has multiple paths leading to the same end point but is dependent on a user variable, like the amount of input DNA. | |
| Colored bullets indicate the cap color of the reagent to be added to a reaction. |
|
| Stopping points in the protocol. |
Starting Material: 100 ng–1 µg Total RNA.
1. Ligate the 3´ SR Adaptor
Note: For total RNA inputs of 100 ng, dilute the
1.1. Mix the following components in a sterile nuclease-free PCR tube:
| Input RNA |
1-6 μl |
| 1 μl |
|
| Nuclease-Free Water |
variable |
| Total Volume |
7 μl |
1.2. Incubate in a preheated thermal cycler for 2 minutes at 70°C. Transfer tube to ice.
1.3. Add the following Components:
| 10 μl |
|
| 3 μl |
|
| Total Volume |
20 μl |
1.4. Incubate for 1 hour at 25°C in a thermal cycler.
Note: Longer incubation times and reduced temperatures (18 hours; 16°C) increase ligation efficiency of methylated RNAs such as piwi-interacting RNAs (piRNAs) (if present in the sample). However, some concatamerization products might be formed.
2. Hybridize the Reverse Transcription Primer
This step is important to prevent adaptor-dimer formation. The SR RT Primer hybridizes to the excess of 3´ SR Adaptor (that remains free after the 3´ ligation reaction) and transforms the single stranded DNA adaptor into a double-stranded DNA molecule. dsDNAs are not substrates for ligation mediated by T4 RNA Ligase 1 and therefore do not ligate to the 5´ SR Adaptor in the subsequent ligation step.
Note: For total RNA inputs of 100 ng, dilute the
 (pink) SR RT Primer for Illumina 1:2 in nuclease free water.
2.1. Add the following components to the ligation mixture from Step 1.4 and mix well:
| Nuclease-Free Water |
4.5 μl |
 (pink) SR RT Primer for Illumina (pink) SR RT Primer for Illumina |
1 μl |
| Total volume now should be |
25.5 μl |
2.2. Heat samples for 5 minutes at 75°C. Transfer to 37°C for 15 minutes, followed by 15 minutes at 25°C.
3. Ligate the 5´ SR Adaptor
3.1. With 5 minutes remaining, resuspend the
 (yellow) 5´ SR adaptor in 120 µl of nuclease free water.
Note: For total RNA inputs of 100 ng, dilute the
(yellow) 5´ SR Adaptor for Illumina 1:2 in nuclease free water.3.2. Aliquot 1.1 N µl of the
(yellow) 5´ SR Adaptor into a separate, nuclease-free 200 µl PCR tube, with N equal to the number of samples being processed for the current experiment.3.3. Incubate the adaptor in the thermal cycler at 70°C for 2 minutes and then immediately place the tube on ice. Keep the tube on ice and use the denatured adaptor within 30 minutes of denaturation.
Note: Store the remaining resuspended 5´ SR adaptor at –80°C.
3.4. Add the following components to the ligation mixture from Step 2.2 and mix well:
| (yellow) 5´ SR Adaptor for Illumina (denatured) |
1 μl |
| (yellow) 5´ Ligation Reaction Buffer (10X) |
1 μl |
| (yellow) 5´ Ligation Enzyme Mix |
2.5 μl |
| Total volume |
30 μl |
3.5. Incubate for 1 hour at 25°C in a thermal cycler.
4. Perform Reverse Transcription
4.1. Mix the following components in a sterile, nuclease-free tube:
| Adaptor Ligated RNA from Step 3.5 |
30 µl |
 (red) First Strand Synthesis Reaction Buffer (red) First Strand Synthesis Reaction Buffer |
8 µl |
| (red) Murine RNase Inhibitor |
1 µl |
| (red) ProtoScript II Reverse Transcriptase |
1 µl |
| Total volume |
40 µl |
4.2. Incubate for 60 minutes at 50°C.
4.3. Immediately proceed to PCR amplification.
| If you do not plan to proceed immediately to PCR amplification, then
heat inactivate the RT reaction at 70°C for 15 minutes. Samples can be
safely stored at –15°C to –25°C. |
5. Perform PCR Amplification
5.1. Add the following components to the RT reaction mix from Step 4.2 and mix well:
 (blue) LongAmp Taq 2X Master Mix (blue) LongAmp Taq 2X Master Mix |
50 μl |
|
(blue) SR Primer for Illumina |
2.5 μl |
|
(blue) Index (X) Primer* |
2.5 μl |
| Nuclease free water |
5 μl |
| Total volume now should be | 100 µl |
*Note: The NEBNext Multiplex Small RNA Library Prep Kit for Illumina contains 1–48 PCR primers, each with a different index. For each reaction, only one of the 48 PCR primer indices is used during the PCR step.
PCR Cycling conditions:
| CYCLE STEP | TEMPERATURE | TIME | CYCLES |
|---|---|---|---|
| Initial Denaturation | 94°C | 30 seconds | 1 |
| Denaturation Annealing/Extension Extension |
94°C 62°C 70°C |
15 seconds 30 seconds 15 seconds |
12–15* |
| Final Extension | 70°C | 5 minutes | 1 |
| Hold | 4°C | ∞ |
* Amplification conditions may vary based on RNA input amount, tissue, and species. This protocol was optimized using 1 µg of total RNA from human brain and 12 PCR cycles. The number of PCR cycles can be adjusted if clear and distinct bands are not observed in the gel image. Run only between 12 and 15 cycles. For 100 ng total RNA input run 15 cycles of PCR.
6. Perform Library QC and Size Selection
Note: There are several different methods for performing size selection. It is recommended to choose the appropriate method based on the QC check of the library using the Bioanalyzer. Size selection using AMPure XP Beads does not remove small fragments. If you perform the QC check and your sample contains Adaptor dimer (127 bp peak) or excess primers (70-80 bp) it is recommended to use gel or Pippin Prep for size selection.
7. QC Check and Size Selection using AMPure XP Beads
7.1. Purify the PCR amplified cDNA construct (100 µl) using a QIAQuick PCR Purification Kit.
IMPORTANT: Before eluting the DNA from the column, centrifuge the column with the lid of the spin column open for 5 minutes at 13,200 rpm. Centrifugation with the lid open ensures that no ethanol remains during DNA elution. It is important to dry the spin column membrane of any residual ethanol that may interfere with the correct loading of the sample on the PAGE gel.
7.2. Elute amplified DNA in 27.5 µl Nuclease-free Water.
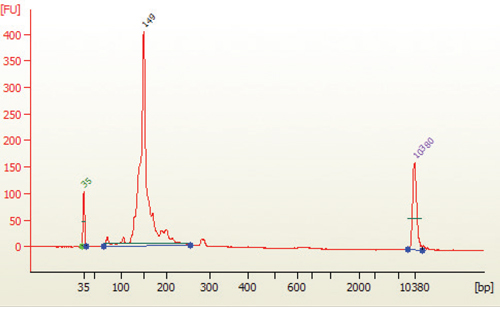
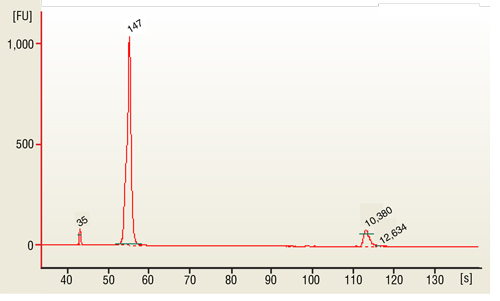
7.3. Load 1 µl of the purified PCR reaction on the Bioanalyzer using a DNA 1000 chip according to the manufacturer's instructions (Figure 1).
7.4. To the purified PCR reaction (25 µl), add 32.5 μl (1.3X) of resuspended AMPure XP beads and mix well on a vortex mixer or by pipetting up and down at least 10 times.
7.5. Incubate for 5 minutes at room temperature.
7.6. Place the tube on an appropriate magnetic stand to separate beads from supernatant. After the solution is clear (about 5 minutes), carefully transfer the supernatant (57.5 µl) to a new tube (Caution: do not discard the supernatant). Discard beads that contain the large DNA fragments.
7.7. Add 92.5 μl (3.7X) of resuspended AMPure XP beads to the supernatant (57.5 μl), mix well and incubate for 5 minutes at room temperature.
7.8. Place the tube on an appropriate magnetic stand to separate beads from supernatant. After the solution is clear (about 5 minutes), carefully remove and discard the supernatant. Be careful not to disturb the beads that contain DNA targets (Caution: do not discard beads).
7.9. Add 200 μl of freshly prepared 80% ethanol to the tube while in the magnetic stand. Incubate at room temperature for 30 seconds, and then carefully remove and discard the supernatant.
7.10. Repeat Step 7.9 once.
7.11. Briefly spin the tube, and put the tube back in the magnetic stand.
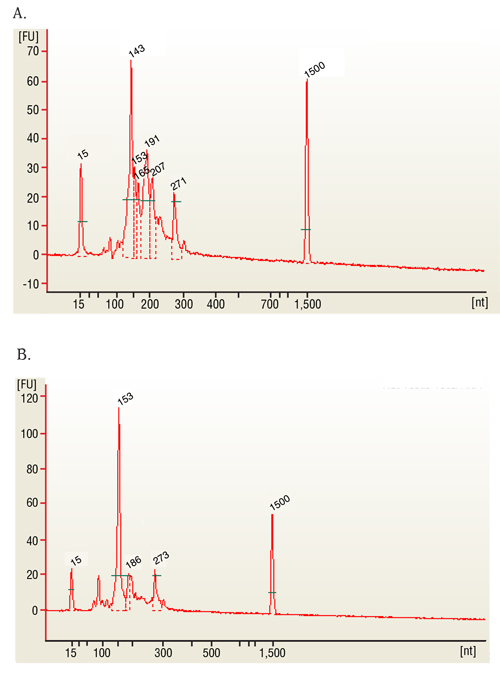
The 143 and 153 bp bands correspond to miRNAs and piRNAs, respectively. The bands on the Bionalyzer electropherograms resolve in sizes ~ 6-8 nucleotides larger than sizes observed on PAGE gels and can shift from sample to sample due to an incorrect identification of the marker by the bioanalyzer software. miRNA peak should be ~ 143-146 bp.
7.12. Completely remove the residual ethanol, and air dry beads for 10 minutes while the tube is on the magnetic stand with lid open.
7.13. Elute the DNA target from the beads with 15 μl nuclease-free water. Mix well on a vortex mixer or by pipetting up and down, and put the tube in the magnetic stand until the solution is clear.
7.14. Transfer the supernatant to a clean PCR tube.
7.15. Run 1 µl on the Bioanalyzer High Sensitivity chip. Check peak distribution and molarity of the small RNA library.
8. QC Check and Size Selection using 6% PolyAcrylamide Gel
8.1. Purify the PCR amplified cDNA construct (100 µl) using a QIAQuick PCR Purification Kit.
IMPORTANT: Before eluting the DNA from the column, centrifuge the column with the lid of the spin column open for 5 minutes at 13,200 rpm. Centrifugation with the lid open ensures that no ethanol remains during DNA elution. It is important to dry the spin column membrane of any residual ethanol that may interfere with the correct loading of the sample on the PAGE gel.
8.2. Elute amplified DNA in 27.5 µl Nuclease-free Water.
8.3. Load 1 µl of the purified PCR reaction on the Bioanalyzer using a DNA 1000 chip according to the manufacturer's instructions (Figure 1).
8.4. Mix the purified PCR product (25 µl) with 5 µl of Gel Loading Dye, Blue (6X).
Note: Vortex the Gel Loading Dye, Blue throughly to mix well before using.
8.5. Load 5 µl of Quick-Load pBR322 DNA-MspI Digest in one well on the 6% PAGE 10-well gel.
8.6. Load two wells with 15 µl each of mixed amplified cDNA construct and loading dye on the 6% PAGE 10-well gel.
8.7. Run the gel for 1 hour at 120 V or until the blue dye reaches the bottom of the gel. Do not let the blue dye exit the gel.
8.8. Remove the gel from the apparatus and stain the gel with SYBR Gold nucleic acid gel stain in a clean container for 2–3 minutes and view the gel on a UV transiluminator (Figure 3).
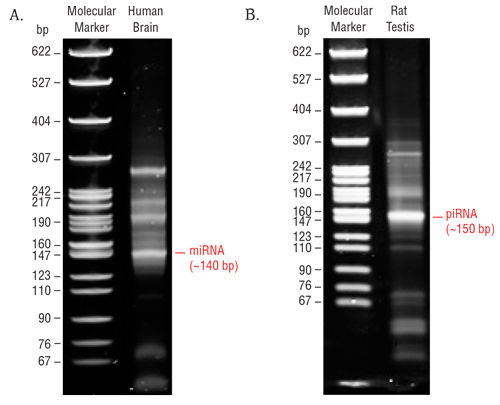
8.9. The 140 and 150 nucleotide bands correspond to adapter-ligated constructs derived from the 21 and 30 nucleotide RNA fragments, respectively. For miRNAs, isolate the bands corresponding to ~140 bp. For piRNAs, isolate the band corresponding to ~150 bp.
8.10. Place the two gel slices from the same sample in one 1.5 ml tube and crush the gel slices with the RNase-free Disposable Pellet Pestles and then soak in 250 µl DNA Gel Elution buffer (1X).
8.11. Rotate end-to-end for at least 2 hours at room temperature.
8.12. Transfer the eluate and the gel debris to the top of a gel filtration column.
8.13. Centrifuge the filter for 2 min at > 13,200 rpm.
8.14. Recover eluate and add 1 µl Linear Acrylamide, 25 µl 3M sodium acetate, pH 5.5 and 750 µl of 100% ethanol.
8.15. Vortex well.
8.16. Precipitate in a dry ice/methanol bath or at –80°C for at least 30 minutes.
8.17. Spin in a microcentrifuge @ > 14,000 x g for 30 minutes at 4°C.
8.18. Remove the supernatant taking care not to disturb the pellet.
8.19. Wash the pellet with 80% ethanol by vortexing vigorously.
8.20. Spin in a microcentrifuge @ > 14,000 x g for 30 minutes at 4°C.
8.21. Air dry pellet for up to 10 minutes at room temperature to remove residual ethanol.
8.22. Resuspend pellet in 12 µl TE Buffer.
8.23. Load 1 µl of the size selected purified library on a 2100 Bioanalyzer using a DNA 1000 or High Sensitivity DNA chip according to the manufacturer's instructions (Figure 4).
8.24. Check the size, purity, and concentration of the sample.
9. QC Check and Size Selection Using Pippin Prep
Size selection of the Small RNA library (147 bp) can done on Pippin Prep instrument using the 3% Agarose, dye free gel with internal standards (Sage Science # CDF3010).
9.1. Purify the PCR amplified cDNA construct (100 μl) using a QIAQuick PCR Purification Kit.
IMPORTANT: Before eluting the DNA from the column, centrifuge the column with the lid of the spin column open for 5 minutes at 13,200 rpm. Centrifugation with the lid open ensures that no ethanol remains during DNA elution
9.2. Elute amplified DNA in 32 μl nuclease-free water.
10. It is recommended to QC your library before performing size selection:
10.1. Load 1 μl of the purified PCR reaction on the Bioanalyzer using a DNA 1000 chip according to the manufacturer's instructions (Figure 1).
10.2. miRNA library should appear as a peak at 147 bp peak (that correspond for 21 nucleotide insert).
11. Program the protocol for size selection on Pippin Prep Instrument as follow:
11.1. In the Pippin Prep software, go to the Protocol Editor Tab.
11.2. Click “Cassette” folder, and select “3% DF Marker F”.
11.3. Select the collection mode as “Range” and enter the size selection parameters as follow: BP start (105) and the BP end (155). BP Range Flag should indicate “broad”. Note: This protocol is optimized to select for 147–149 bp peak.
11.4. Click the “Use of Internal Standards” button.
11.5. Make sure the “Ref Lane” values match the lane numbers.
11.6. Press “Save As” and name and save the protocol.
12. Prepare sample for size selection as follow:
12.1. Bring loading solution to room temperature
12.2. For each sample, combine 30 µl sample with 10 µl of DNA marker F (labeled F).
12.3. Mix samples thoroughly (vortex mixer). Briefly centrifuge to collect.
12.4. Load 40 µl (DNA plus marker) on one well of the 3% agarose cassette.
12.5. Run the program with the settings indicated above.
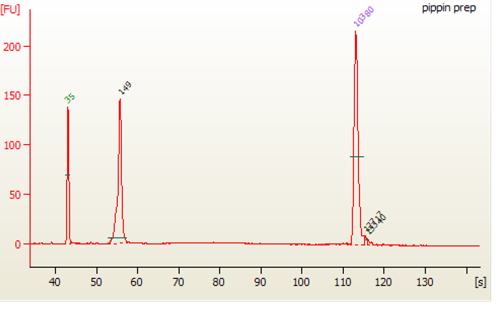
12.6. After sample has been eluted, collect 40 µl sample from elution well. Run 1 µl in a Bioanalzyer using the high sensitivity chip.
Note: If the Ethidium Bromide free cassettes was used, no purification is required before running sample on the bioanalyzer.