Protocol for use with NEBNext DNA Library Prep Master Mix Set for Illumina (E6040)
Symbols
 |
This is a point where you can safely stop the protocol and store the samples prior to proceeding to the next step in the protocol. |
 |
This caution sign signifies a step in the protocol that has two paths leading to the same end point but is dependent on a user variable, like the type of RNA input. |
 |
Colored bullets indicate the cap color of the reagent to be added |
Starting Material: 1–5 μg of fragmented DNA.
1.1 End Repair of Fragmented DNA
- Mix the following components in a sterile microfuge tube:
Fragmented DNA 1–85 µl  (green) NEBNext End Repair Reaction Buffer (10X)
 10 µl (green) NEBNext End Repair Enzyme Mix5 µl Sterile H2O Variable Total Volume 100 µl - Incubate in a thermal cycler for 30 minutes at 20°C.
1.2 Cleanup Using AMPure XP® Beads (Beckman Coulter, Inc.)
- Vortex AMPure XP beads to resuspend.
- Add 160 μl (1.6X) of resuspended AMPure XP Beads to the ligation reaction. Mix thoroughly on a vortex mixer or by pipetting up and down at least 10 times.
- Incubate for 5 minutes at room temperature.
- Put the tube/PCR plate on an appropriate magnetic stand to separate beads from supernatant. After the solution is clear (about 5 minutes), carefully remove and discard the supernatant. Be careful not to disturb the beads that contain the DNA targets.
- Add 200 μl of 80% freshly prepared ethanol to the tube/PCR plate while in the magnetic stand. Incubate at room temperature for 30 seconds, and then carefully remove and discard the supernatant.
- Repeat Step 5 once.
- Air dry beads for up to 5 minutes while the tube/PCR plate is on the magnetic stand with the lid open.
Caution: Do not over-dry the beads. This may result in lower recovery of DNA target. Elute the samples when the beads are still dark brown and glossy looking, but when all visible liquid has evaporated. When the beads turn lighter brown and start to crack, they are too dry. - Remove the tube/plate from the magnet. Elute the DNA target from the beads by adding 47 μl of 10 mM Tris-HCl or 0.1X TE.
- Mix well on a vortex mixer or by pipetting up and down 10 times and incubate for 2 minutes at room temperature.
- Put the tube/PCR plate in the magnetic stand until the solution is clear. Without disturbing the bead pellet, carefully transfer 42 μl of the supernatant to a fresh, sterile microfuge tube.
1.3 dA-Tailing of End Repaired DNA
- Mix the following components in a sterile microfuge tube:
End Repaired, Blunt DNA 42 μl  (yellow) NEBNext dA-Tailing Reaction Buffer (10X)
 5 μl  (yellow) Klenow Fragment (3´→ 5´ exo–)
3 μl
Total Volume 50 µl - Incubate in a thermal cycler for 30 minutes at 37°C.
1.4 Cleanup Using AMPure XP Beads
- Vortex AMPure XP beads to resuspend.
- Add 90 μl (1.8X) of resuspended AMPure XP Beads to the ligation reaction. Mix thoroughly on a vortex mixer or by pipetting up and down at least 10 times.
- Incubate for 5 minutes at room temperature.
- Put the tube/PCR plate on an appropriate magnetic stand to separate beads from supernatant. After the solution is clear (about 5 minutes), carefully remove and discard the supernatant. Be careful not to disturb the beads that contain the DNA targets.
- Add 200 μl of 80% freshly prepared ethanol to the tube/PCR plate while in the magnetic stand. Incubate at room temperature for 30 seconds, and then carefully remove and discard the supernatant.
- Repeat Step 5 once.
- Air dry beads for up to 5 minutes while the tube/PCR plate is on the magnetic stand with the lid open.
Caution: Do not over-dry the beads. This may result in lower recovery of DNA target. Elute the samples when the beads are still dark brown and glossy looking, but when all visible liquid has evaporated. When the beads turn lighter brown and start to crack, they are too dry. - Remove the tube/plate from the magnet. Elute the DNA target from the beads by adding 30 μl of 10 mM Tris-HCl or 0.1X TE.
- Mix well on a vortex mixer or by pipetting up and down 10 times and incubate for 2 minutes at room temperature.
- Put the tube/PCR plate in the magnetic stand until the solution is clear. Without disturbing the bead pellet, carefully transfer 25 μl of the supernatant to a fresh, sterile microfuge tube.
1.5 Adaptor Ligation of dA-Tailed DNA
- Mix the following components in a sterile microfuge tube:
*The NEBNext adaptor is provided in NEBNext Oligo kits. NEB has several oligo kit options, which are supplied separately from the library prep kit.dA-Tailed DNA 25 μl  (red) Quick Ligation Reaction Buffer (5X)
 10 μl (red) NEBNext Adaptor* 10 μl  (red) Quick T4 DNA Ligase
5 μl Total volume 50 μl - Incubate in a thermal cycler for 15 minutes at 20°C.
- Add 3 μl of
 (red) USER™ Enzyme Mix by pipetting up and down 10 times, and incubate at 37°C for 15 minutes.
Note: This step is only required for use with NEBNext Adaptors. USER™ enzyme can be found in the NEBNext Singleplex or Multiplex Oligos for Illumina.
![]()
![]() A precipitate can form upon thawing of the NEBNext Q5 Hot Start HiFi PCR Master Mix. To ensure optimal performance, place the master mix at room temperature while performing cleanup of adaptor-ligated DNA. Once thawed, gently mix by inverting the tube several times.
A precipitate can form upon thawing of the NEBNext Q5 Hot Start HiFi PCR Master Mix. To ensure optimal performance, place the master mix at room temperature while performing cleanup of adaptor-ligated DNA. Once thawed, gently mix by inverting the tube several times.
1.6 Clean Up of Adaptor Ligated DNA
- Vortex AMPure XP Beads to resuspend.
- Add 90 μl of resuspended AMPure XP Beads to the ligation reaction (~53 μl). Mix thoroughly on a vortex mixer or by pipetting up and down at least 10 times.
- Incubate for 5 minutes at room temperature.
- Put the tube/PCR plate on an appropriate magnetic stand to separate beads from supernatant. After the solution is clear (about 5 minutes), carefully remove and discard the supernatant. Be careful not to disturb the beads that contain the DNA targets.
- Add 200 μl of 80% freshly prepared ethanol to the tube/PCR plate while in the magnetic stand. Incubate at room temperature for 30 seconds, and then carefully remove and discard the supernatant.
- Repeat Step 5 once.
- Air dry beads for up to 5 minutes while the tube/PCR plate is on the magnetic stand with the lid open.
Caution: Do not over-dry the beads. This may result in lower recovery of DNA target. Elute the samples when the beads are still dark brown and glossy looking, but when all visible liquid has evaporated. When the beads turn lighter brown and start to crack, they are too dry. - Remove the tube/plate from the magnet. Elute the DNA target by adding 105 μl of 10 mM Tris-HCl or 0.1 X TE to the beads for bead-based size selection.
Note: For size selection using E-Gel size select gels or standard 2% agarose gels, elute the DNA target at desired volume. - Mix well on a vortex mixer or by pipetting up and down 10 times and incubate for 2 minutes at room temperature.
- Put the tube/PCR plate in the magnetic stand until the solution is clear. Transfer 100 μl of supernatant (or desired volume) to a new tube/well, and proceed to bead based size selection.
1.7 Size Selection of Adaptor Ligated DNA Using Agencourt AMPure XP Beads
| Insert Size | 150 bp | 200 bp | 250 bp | 300 bp | 400 bp | 500 bp | 700 bp |
|---|---|---|---|---|---|---|---|
| Total library size (insert + adaptor) |
270 bp | 320 bp | 370 bp | 420 bp | 530 bp | 660 bp | 820 bp |
| Bead: DNA ratio* 1st bead selection |
0.9X | 0.8X | 0.7X | 0.6X | 0.55X | 0.5X | 0.45X |
| Bead: DNA ratio* 2nd bead selection |
0.2X | 0.2X | 0.2X | 0.2X | 0.15X | 0.15X | 0.15X |
![]() The following size selection protocol is for libraries with 200 bp inserts only. For libraries with different size fragment inserts, please optimize bead: DNA ratio according to Table 1.1 above.
The following size selection protocol is for libraries with 200 bp inserts only. For libraries with different size fragment inserts, please optimize bead: DNA ratio according to Table 1.1 above.
Note: (X) refers to the original sample volume of 100 μl
- Add 80 μl (0.8X) resuspended AMPure XP beads to 100 μl DNA solution. Mix well on a vortex mixer or by gently pipetting up and down at least 10 times.
- Incubate for 5 minutes at room temperature.
- Place the tube/pcr plate on an appropriate magnetic stand to separate beads from supernatant. After the solution is clear (about 5 minutes), carefully transfer the supernatant to a new tube/well (Caution: do not discard the supernatant). Discard beads that contain the large fragments.
- Add 20 μl (0.2X) resuspended AMPure XP Beads to the supernatant, mix well and incubate for 5 minutes at room temperature.
- Put the tube/PCR plate on an appropriate magnetic stand to separate beads from supernatant. After the solution is clear (about 5 minutes), carefully remove and discard the supernatant. Be careful not to disturb the beads that contain DNA targets (Caution: do not discard beads).
- Add 200 μl of freshly prepared 80% ethanol to the tube/PCR plate while in the magnetic stand. Incubate at room temperature for 30 seconds, and then carefully remove and discard the supernatant.
- Repeat Step 6 once.
- Air dry beads for up to 5 minutes while the tube/PCR plate is on the magnetic stand with the lid open.
Caution: Do not over-dry the beads. This may result in lower recovery of DNA target. Elute the samples when the beads are still dark brown and glossy looking, but when all visible liquid has evaporated. When the beads turn lighter brown and start to crack, they are too dry. - Remove the tube/plate from the magnet. Elute DNA target from the beads by adding 17 μl 10 mM Tris-HCl or 0.1X TE.
- Mix well on a vortex mixer or by pipetting up and down 10 times and incubate for 2 minutes at room temperature.
- Put the tube/PCR plate in the magnetic stand until the solution is clear. Without disturbing the bead pellet, carefully transfer 15 μl of the supernatant to a clean PCR tube and proceed to enrichment.
1.8 PCR Enrichment of Adaptor Ligated DNA
![]() Use Option A for any NEBNext oligos kit where index primers are supplied in tubes. These kits have the forward and reverse primers supplied in separate tubes.
Use Option A for any NEBNext oligos kit where index primers are supplied in tubes. These kits have the forward and reverse primers supplied in separate tubes.
Use Option B for any NEBNext oligos kit where index primers are supplied in a 96-well format. These kits have the forward and reverse (i7 and i5) primers combined.
1.8A. Option A.
- Mix the following components in sterile strip tubes:
Adaptor Ligated DNA Fragments 15 µl  (blue) Index Primer/i7 Primer*,**
5 µl (blue) Universal PCR Primer/i5 Primer*,**5 µl (blue) NEBNext Q5 Hot Start HiFi PCR Master Mix25 µl Total Volume 50 µl
Option B.
- Mix the following components in sterile strip tubes:
Adaptor Ligated DNA Fragments 15 µl (blue) i7/i5 Primer Mix*
0 µl (blue) NEBNext Q5 Hot Start HiFi PCR Master Mix25 µl Total Volume 50 µl
*NEBNext Oligos must be purchased separately from the library prep kit. Refer to the corresponded NEBNext Oligo kit manual for determining valid barcode combinations.
**Use only one i7 primer per sample. Use only one i5 (or the universal primer for single index kits) per sample.
2. PCR cycling conditions:
| CYCLE STEP | TEMP | TIME | CYCLES |
|---|---|---|---|
| Initial Denaturation | 98°C | 30 seconds | 1 |
| Denaturation | 98°C | 10 seconds | 2–4* |
| Annealing/Extension | 65°C | 75 seconds | |
| Final Extension | 65°C | 5 minutes | 1 |
| Hold | 4°C | ∞ |
* If library construction was performed with 5 μg of starting material, use 2–4 cycles of amplification. If starting material was 1 μg, use 4 cycles of amplification. However, optimization of PCR cycle number may be required to avoid over-amplification.
3. Proceed to Cleanup Using AMPure XP Beads in Section 1.9
1.9 Clean Up Using Agencourt AMPure XP Beads
- Vortex Agencourt AMPure XP Beads to resuspend.
- Add 45 μl (0.9X) of resuspended AMPure XP Beads to the PCR reactions (~50 μl). Mix well on a vortex mixer or by pipetting up and down at least 10 times.
- Incubate for 5 minutes at room temperature.
- Put the tube/PCR plate on an appropriate magnetic stand to separate beads from supernatant. After the solution is clear (about 5 minutes), carefully remove and discard the supernatant. Be careful not to disturb the beads that contain the DNA targets.
- Add 200 μl of freshly prepared 80% ethanol to the tube/PCR plate while in the magnetic stand. Incubate at room temperature for 30 seconds, and then carefully remove and discard the supernatant.
- Repeat Step 5 once.
- Air dry the beads for 5 minutes while the tube/PCR plate is on the magnetic stand with the lid open.
Caution: Do not over-dry the beads. This may result in lower recovery of DNA target. Elute the samples when the beads are still dark brown and glossy looking, but when all visible liquid has evaporated. When the beads turn lighter brown and start to crack, they are too dry. - Remove the tube/plate from the magnet. Elute the DNA target from the beads by adding 30 μl of 0.1X TE.
- Mix well on a vortex mixer or by pipetting up and down 10 times and incubate for 2 minutes at room temperature.
- Put the tube/PCR plate in the magnetic stand until the solution is clear. Without disturbing the bead pellet, carefully transfer 25 μl of the supernatant to a clean LoBind® (Eppendorf AG) tube. Libraries can be stored at –20°C.
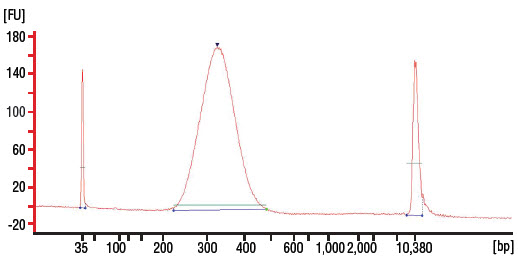
- Dilute 2–3 μl of the library 20 fold with 10 mM Tris-HCl or 0.1X TE and assess the library quality on a Bioanalyzer® (Agilent Technologies, Inc.) high sensitivity chip. Check that the electropherogram shows a narrow distribution with a peak size approximately 300–320 bp.